Deploying HP StoreOnce VSA with HP Data Protector - Part III
In part I of this series I showed you the download and the deployment of the HP StoreOnce VSA. Part II showed you the configuration of two libraries and the connection of the backup server to this two tape libraries. Part III of this series covers the configuration of devices and meda pools in HP Data Protector 8.1. This article will not show the installation of HP Data Protector 8.1.
Device configuration
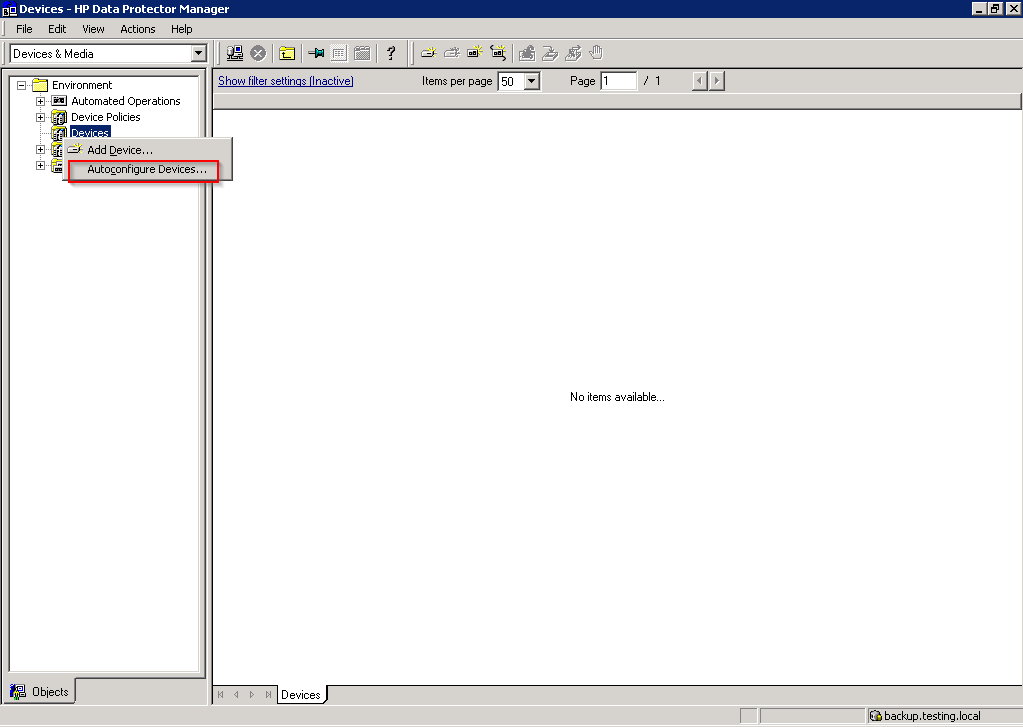
The first step is to configure the devices. Select “Devices & Media” from the drop-down menu and right-click “Devices”. Select “Autoconfigure Devices…”.
Patrick Terlisten/ vcloudnine.de/ Creative Commons CC0
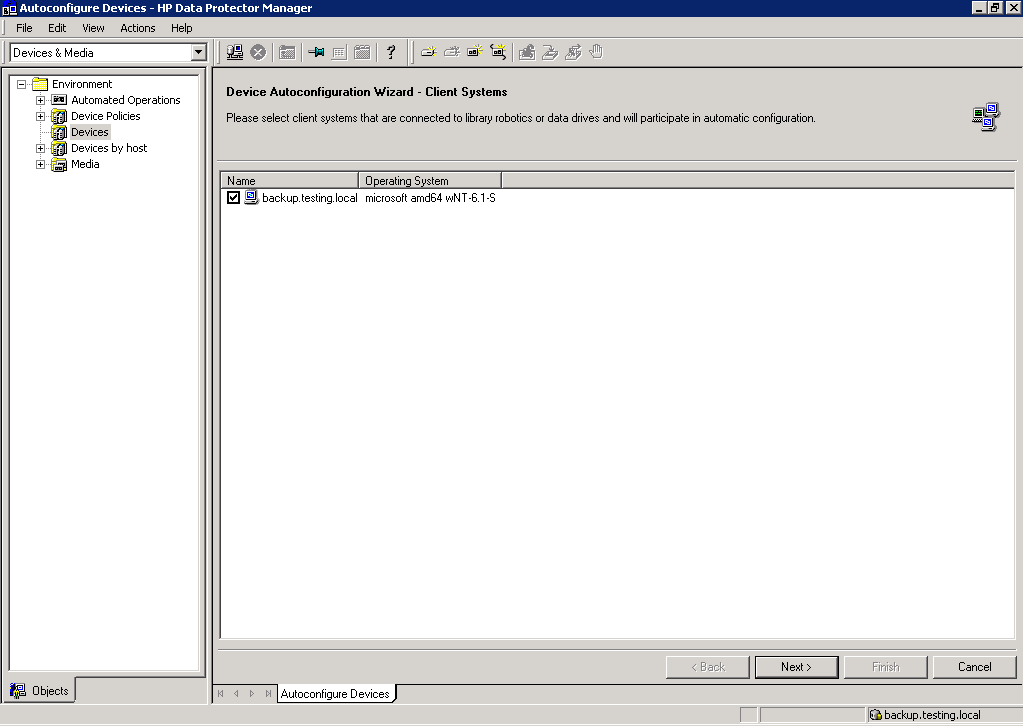
The wizard shows all clients of the cell, that have a media agent (MA) installed. In my example only the backup server has a MA installed. Enable the checkbox and click “Next”.
Patrick Terlisten/ vcloudnine.de/ Creative Commons CC0
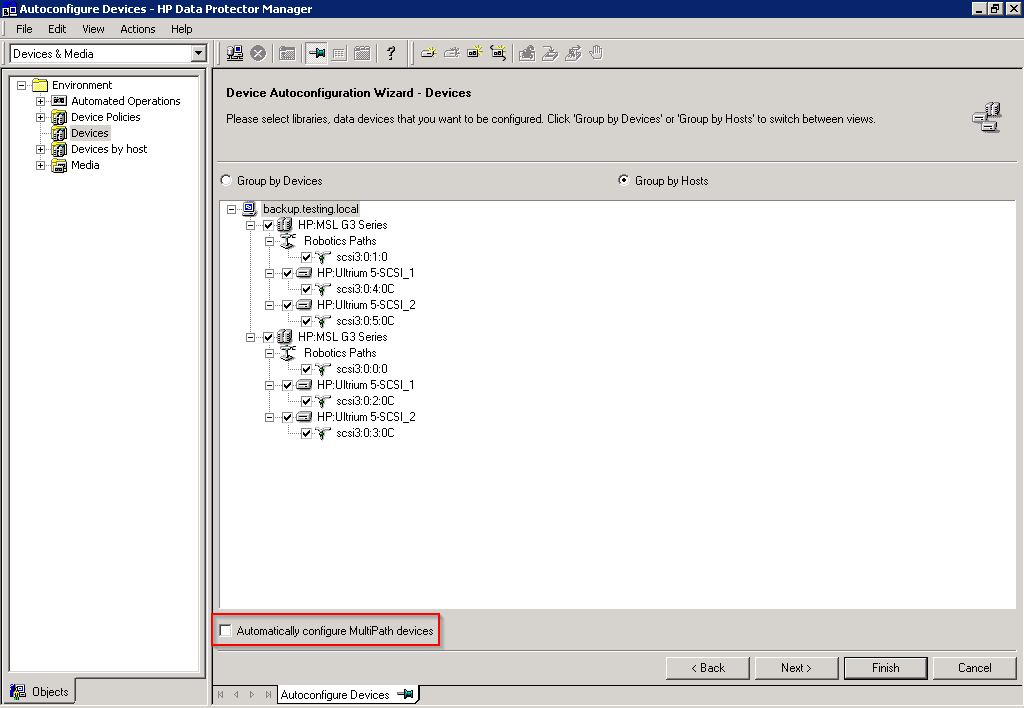
Data Protector now discovers the devices, that are attached to the server with the MA. There are two different views: “Group by Devices” shows the devices on top and the MA, that can use the device, as leafs. “Group by Hosts” likewise, but starting point is the host, not the device. I unchecked “Automatically configure MultiPath devices”, because the libraries are only attached to one host. Theoretically you can connect the library to more than one host (device sharing). Click “Finish”.
Patrick Terlisten/ vcloudnine.de/ Creative Commons CC0
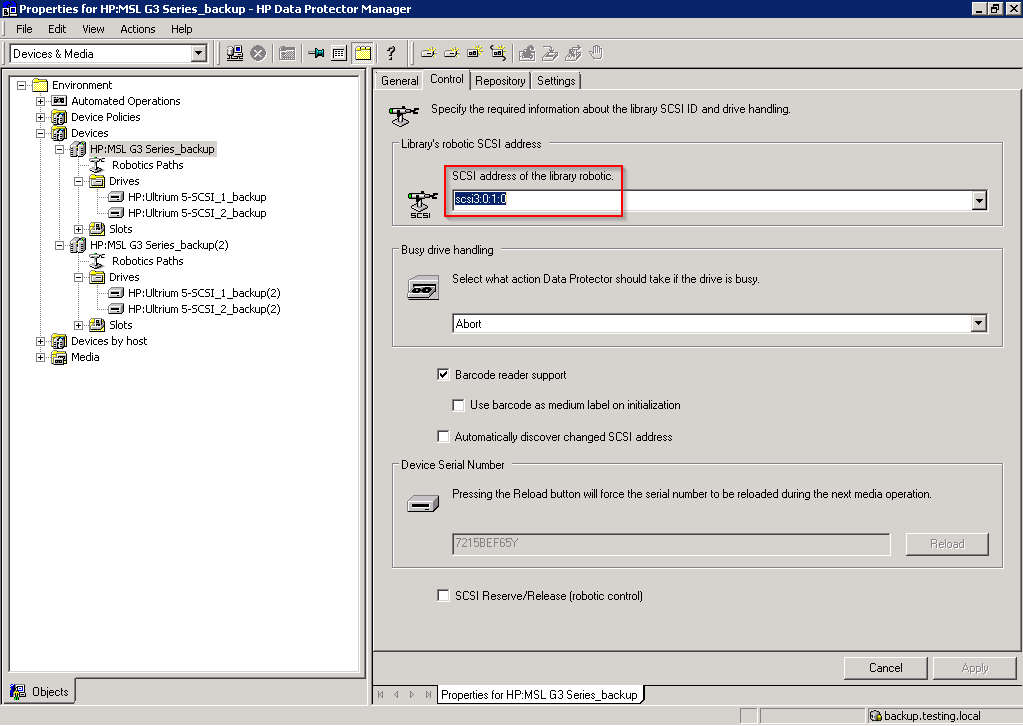
Now you have two tape libraries. The naming is confusing, so check the SCSI ID in the device properties and the iSCSI initiator. Usually the first presented library is the first device on the SCSI bus. It might be useful to enable the checkbox “Automatically discover changed SCSI address”.
Patrick Terlisten/ vcloudnine.de/ Creative Commons CC0
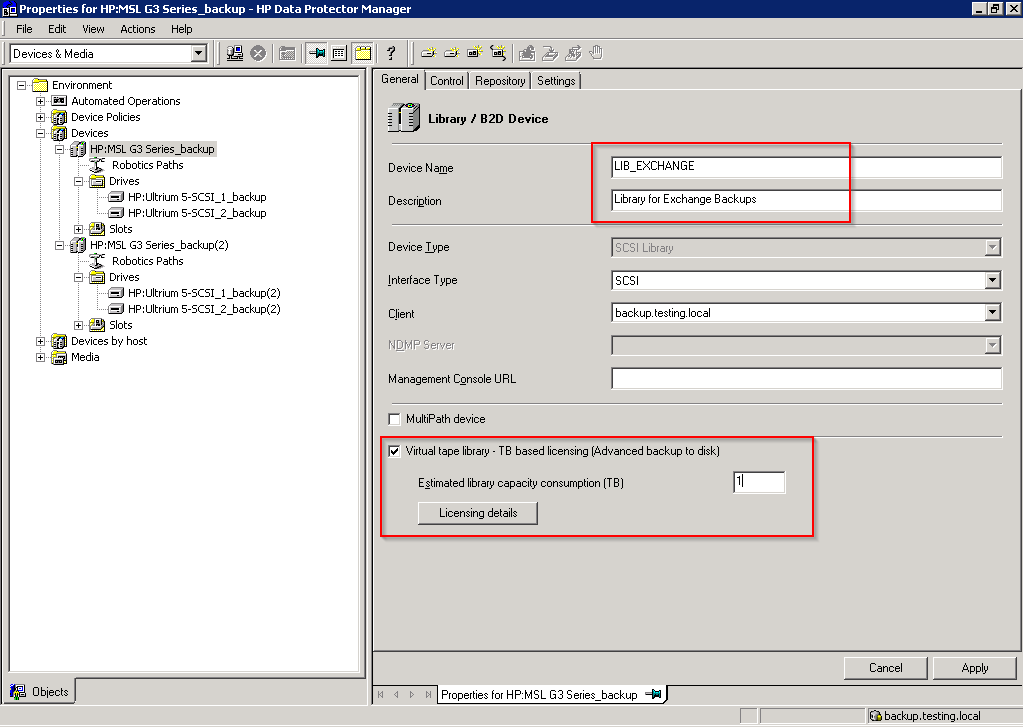
Switch to the “General” tab and rename the library. You also have to enable the “Virtual Tape Library” checkbox. This checkbox tells Data Protector, that this device is part of a VTL and it’s licensed by capacity. If you license the usable capacity of a StoreOnce appliance or VSA with Data Protector “Advanced Backup to Disk” licenses, you can create as much devices as the StoreOnce appliance or VSA support. You don’t have to license drives! This is a huge benefit, because you can create a library for each server. This ensures LAN-free backup and optimal deduplication results.
Patrick Terlisten/ vcloudnine.de/ Creative Commons CC0
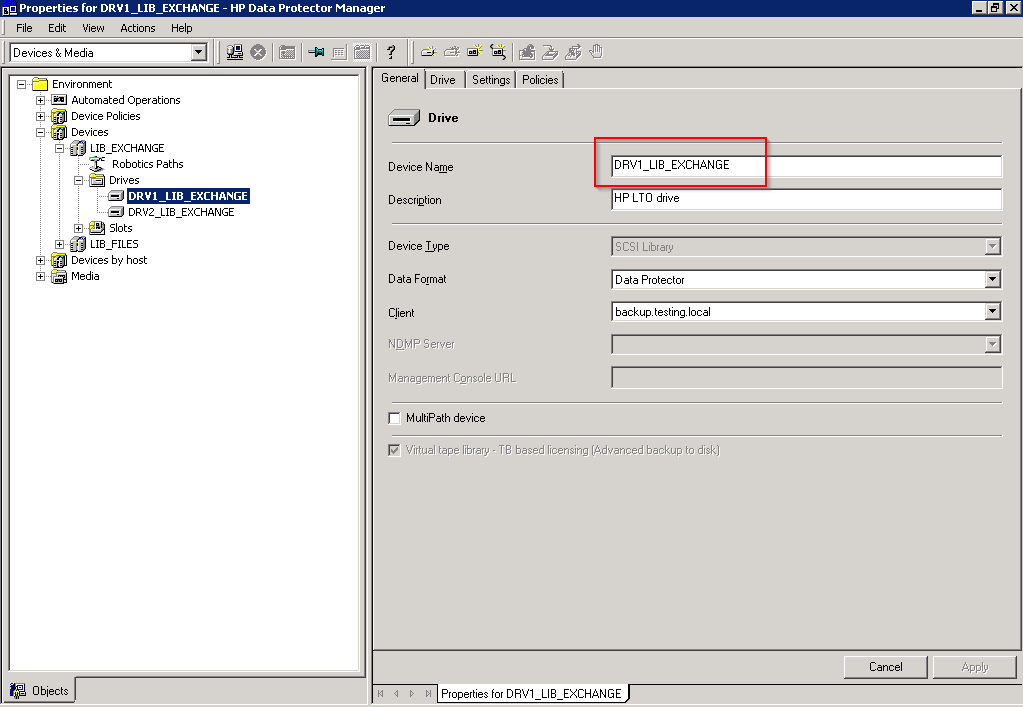
Rename the drives.
Patrick Terlisten/ vcloudnine.de/ Creative Commons CC0
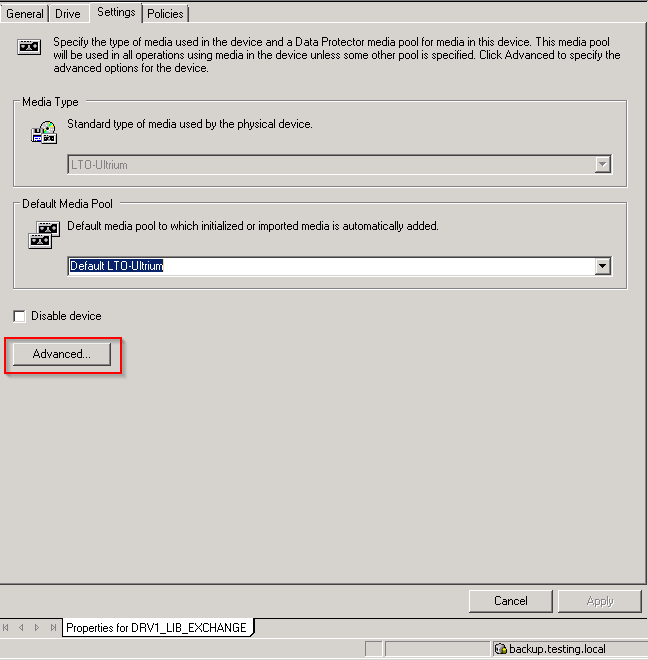
Switch to the “Settings” tab and click “Advanced”.
Patrick Terlisten/ vcloudnine.de/ Creative Commons CC0
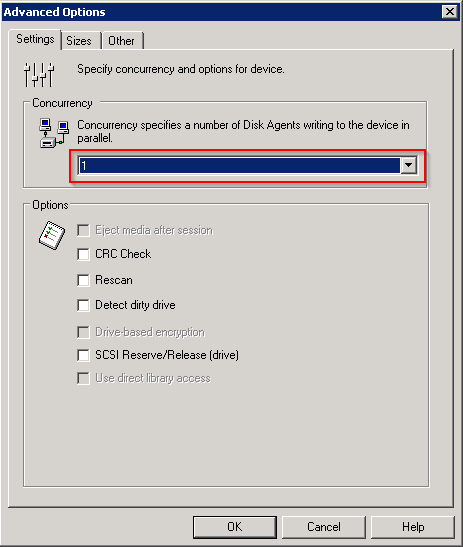
Set the “Concurrency” to 1. This ensures that only one data stream can write to the device. This disables multiplexing! But because you can create multiple libraries with multiple drives, you can use multistreaming. In this case each Disk Agent (DA) writes to a single device and a single (virtual) tape media.
Patrick Terlisten/ vcloudnine.de/ Creative Commons CC0
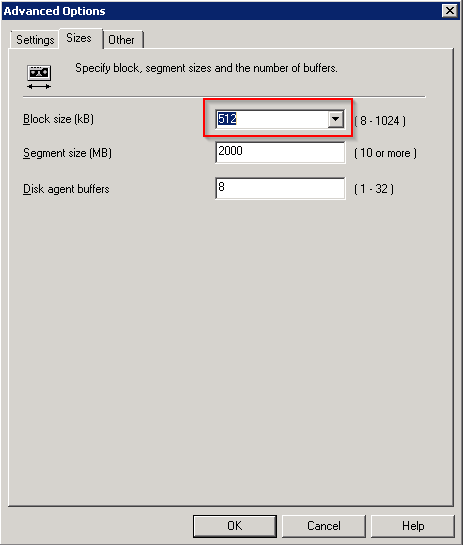
Switch to the “Sizes” tab and set the block size from 256 kB to 512 kB. This provides the best deduplication and performance balance. Click “OK”.
Patrick Terlisten/ vcloudnine.de/ Creative Commons CC0
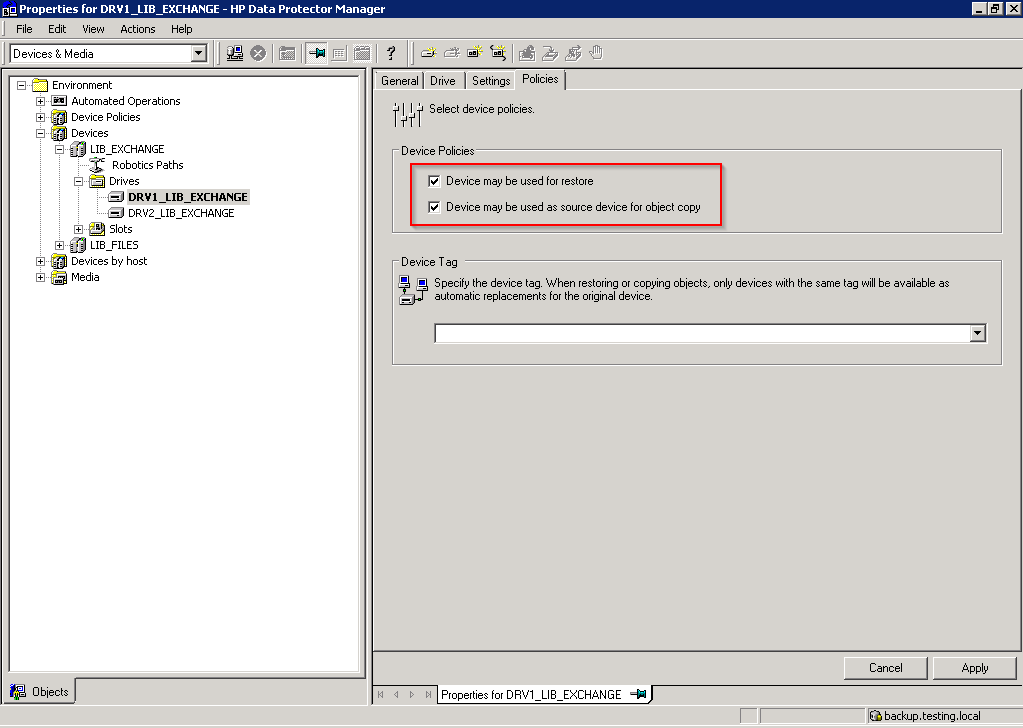
Enable the two checkboxes in the “Device Policy” section. Click “Apply”.
Patrick Terlisten/ vcloudnine.de/ Creative Commons CC0
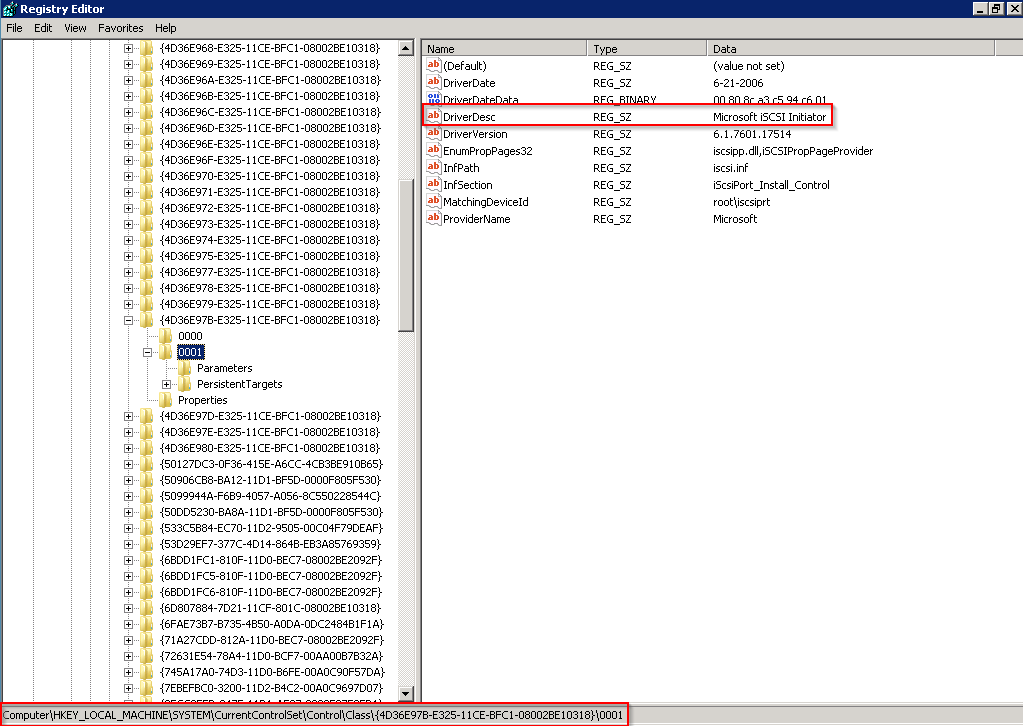
Because we changed the block size to 512 kB, we need to adjust the “MaxTransferLength” value of the iSCSI initiator.
Patrick Terlisten/ vcloudnine.de/ Creative Commons CC0
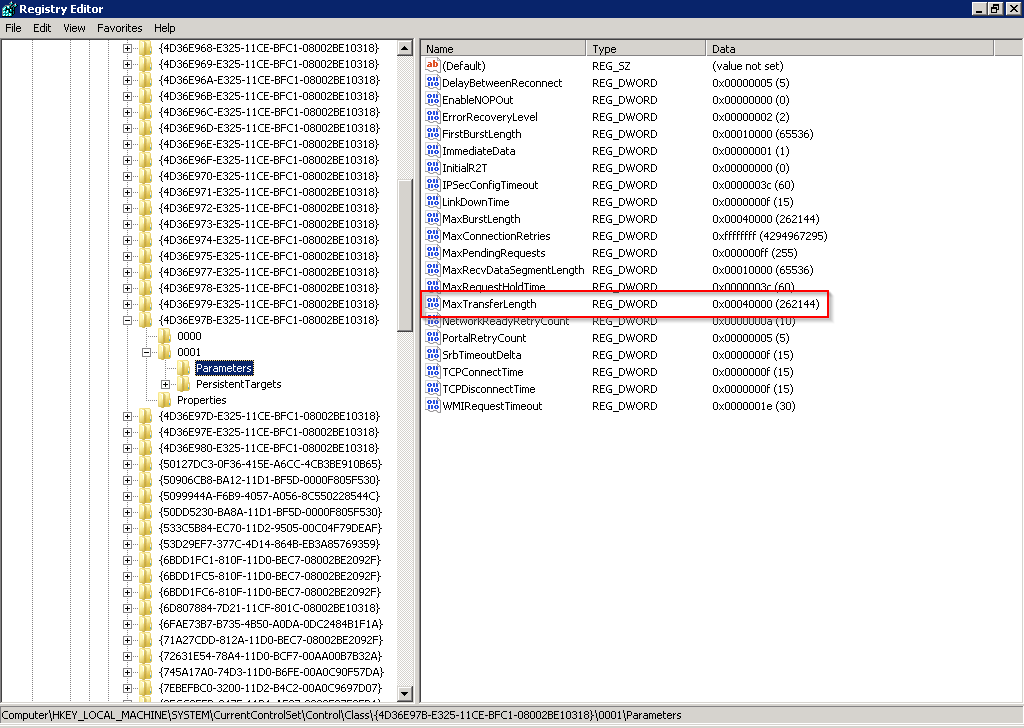
Change the “MaxTransferLength” from 40000 to 80000. 0x40000 is 262144 in decimal. So you need to double the value.
Patrick Terlisten/ vcloudnine.de/ Creative Commons CC0
The device configuration is finished. Now we need to configure the media pools.
Media pool configuration
Each library need their own tape media pool. In the “Devices & Media” section right-click the “Add Media Pool…” und “Media > Pools”.
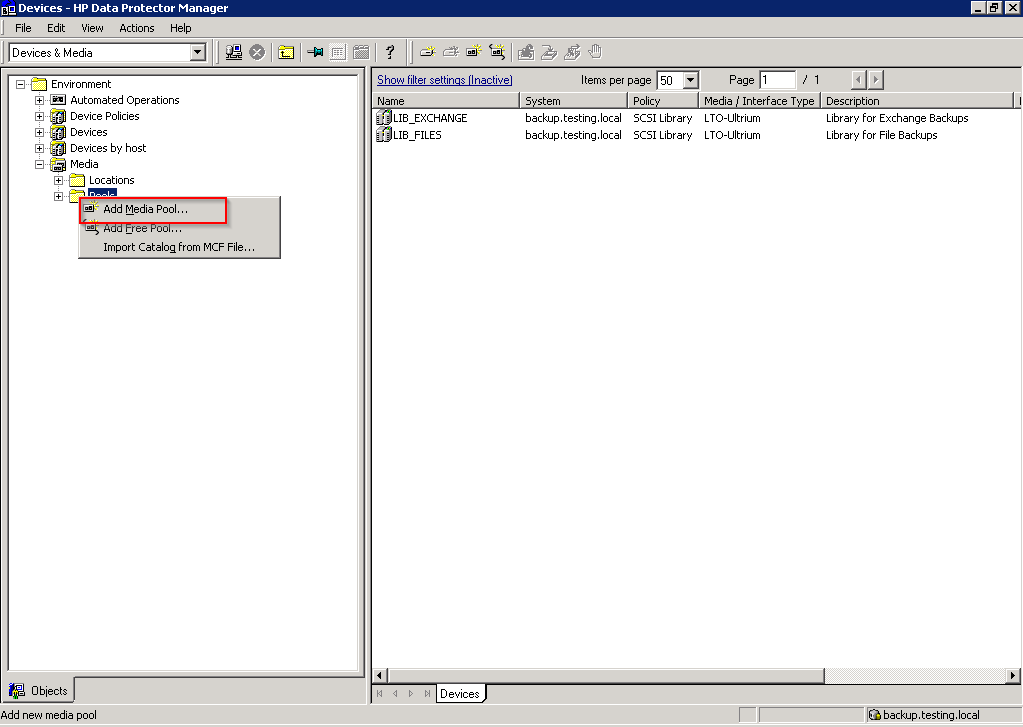
Patrick Terlisten/ vcloudnine.de/ Creative Commons CC0
Enter a name and select the appropiate media type.
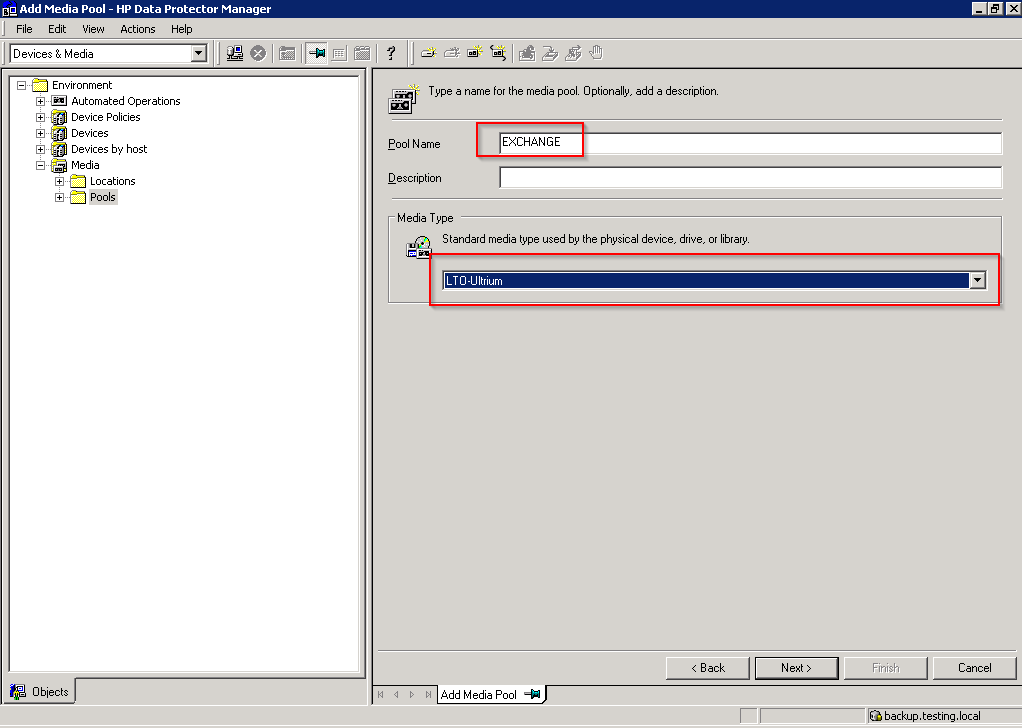
Patrick Terlisten/ vcloudnine.de/ Creative Commons CC0
Make sure, that the media in this pool are not ppendable! This is especially then useful, if you use the replication feature between StoreOnce appliances or VSA. For best effort, set the pool to “Non Appendable”. Leave the other options untouched.
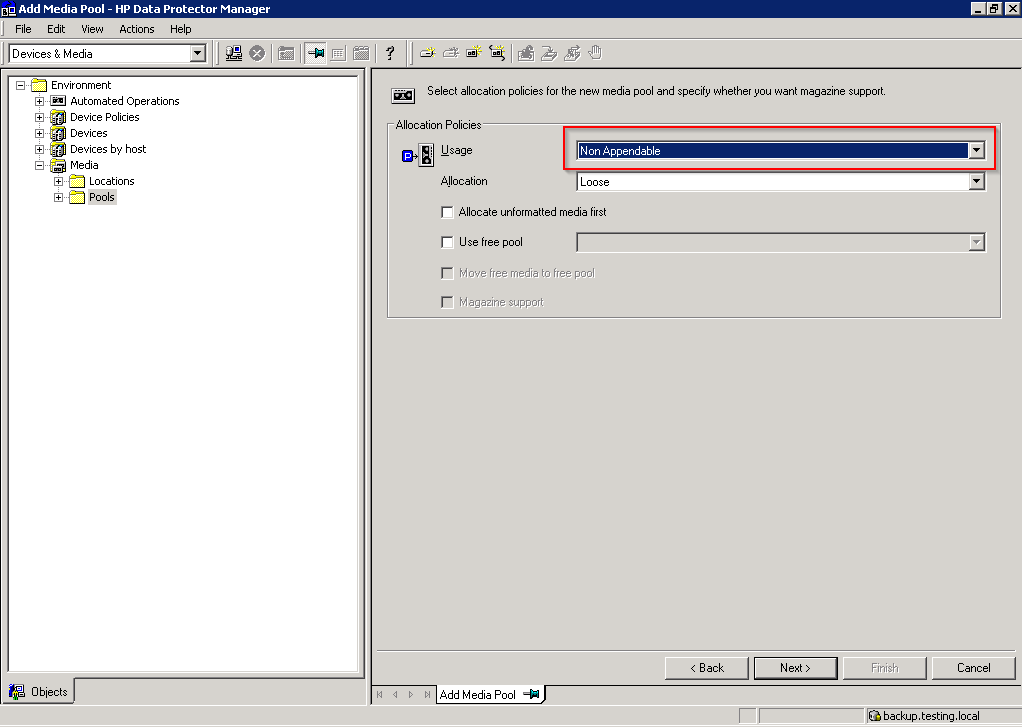
Patrick Terlisten/ vcloudnine.de/ Creative Commons CC0
Click “Finish”.
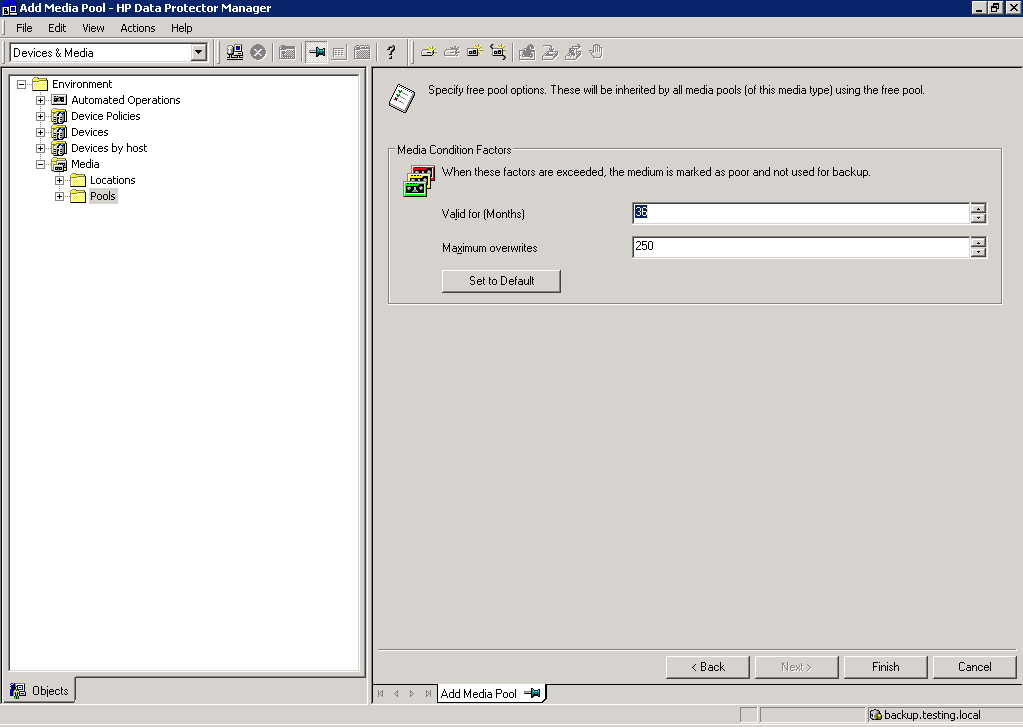
Patrick Terlisten/ vcloudnine.de/ Creative Commons CC0
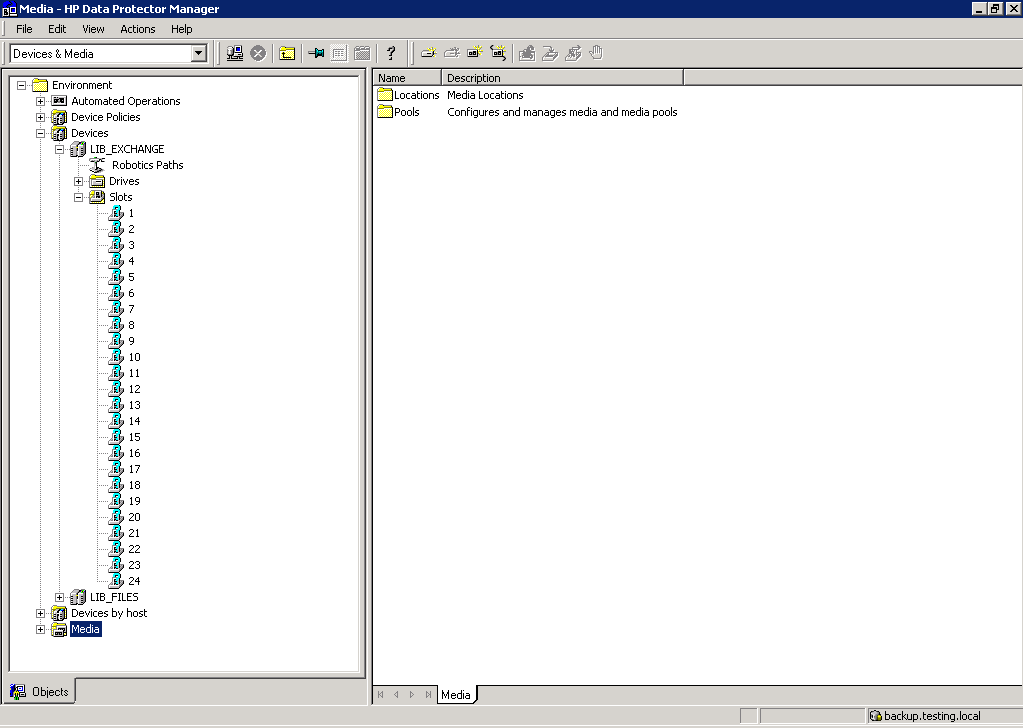
You will notice, that the media in the library are marked with a questionmark. Don’t format the tapes! Proceed with the next step.
Patrick Terlisten/ vcloudnine.de/ Creative Commons CC0
Open a Windows Explorer and navigate to C:\ProgramData\OmniBack\Config\Server\Options. Make a backup of the “global” file. Open the file and search for “InitOnLoosePolicy”. Set this value to 1. Save the file and restart the Server. This restart is also necessary, because of the registry change we made earlier. This setting makes it possible, that Data Protector can format media as needed. Usually Data Protector will reuse media after the data on the tape has expired. The “InitOnLoosePolicy” option in combination with a library, that has enough slots (you can’t vault media in a VTL…) and non appendable pools ensures, that the minimal possible number of tapes is used and that the StoreOnce housekeeping makes a good job.

Patrick Terlisten/ vcloudnine.de/ Creative Commons CC0
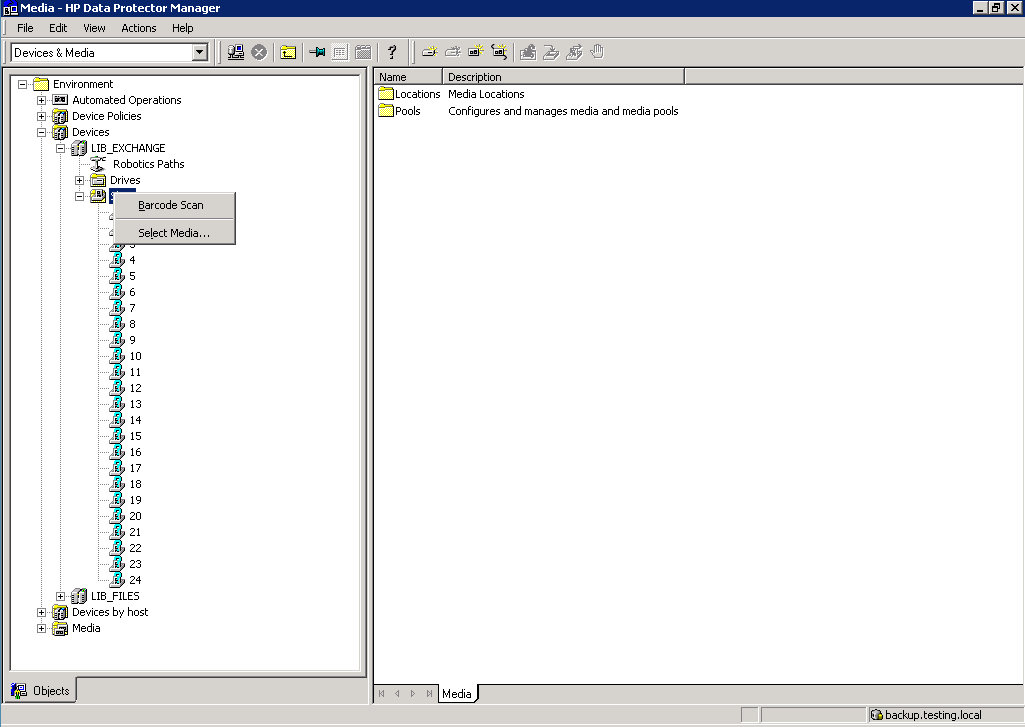
Right-click “Slots” on the library and start a “Barcode Scan”.
Patrick Terlisten/ vcloudnine.de/ Creative Commons CC0
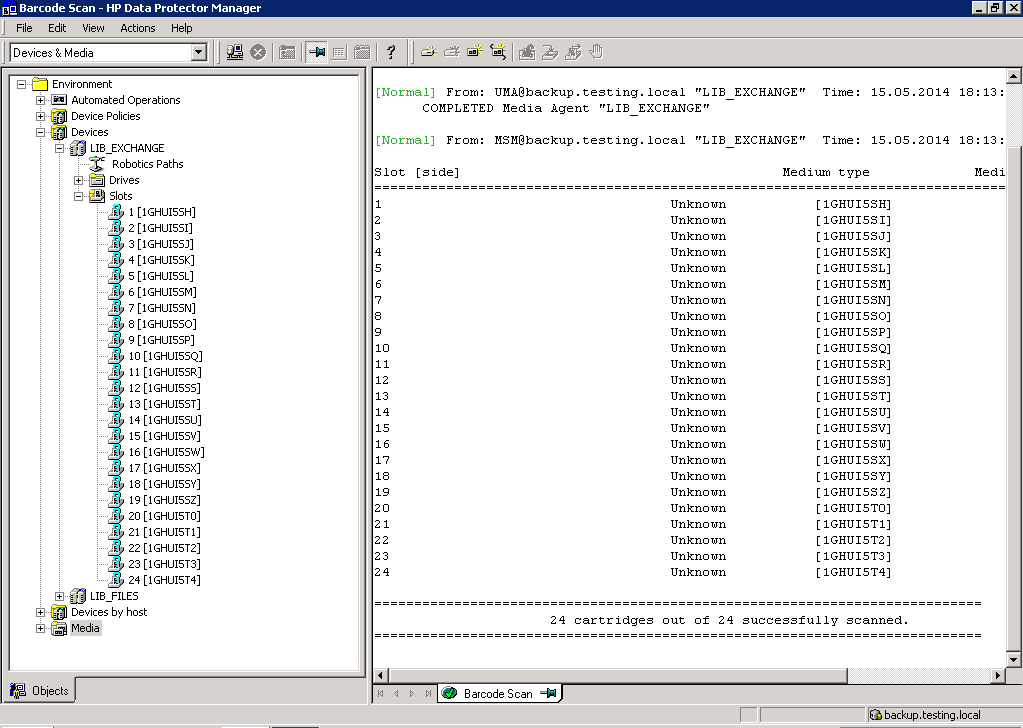
After the rescan, Data Protector will show a barcode label for each tape. Each tape is detected as “Blank”. Please remember: Don’t format the tapes!
Patrick Terlisten/ vcloudnine.de/ Creative Commons CC0
Moment of truth
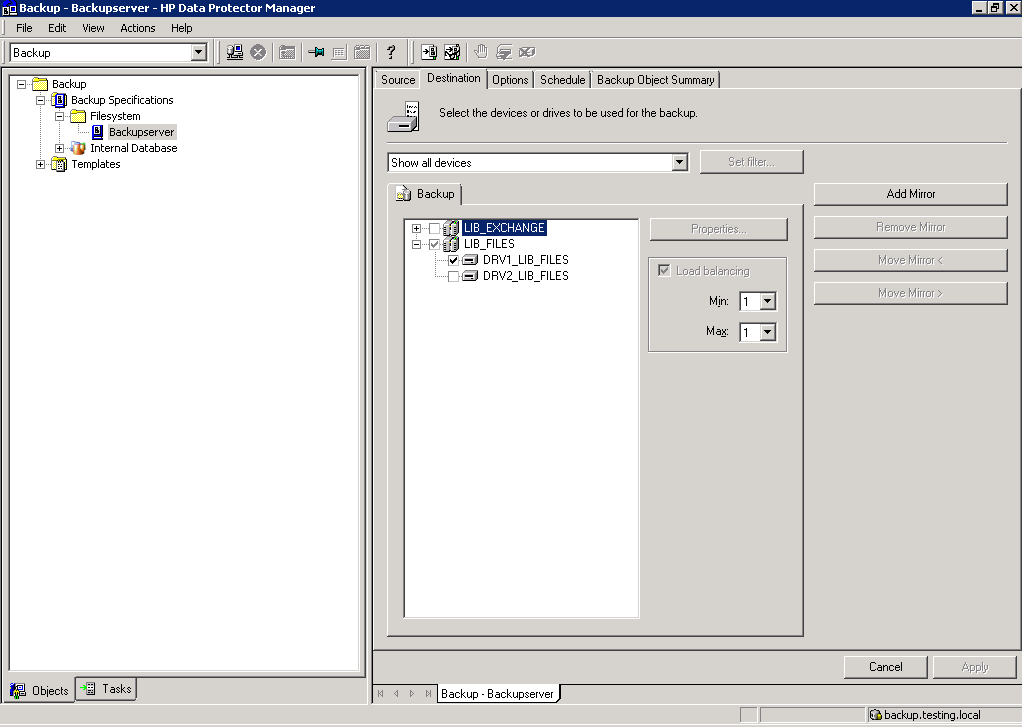
Now it’s time to test our backup with a job. I created a simple job, that makes a filesystem backup of my backup server. I use only one drive, because the server has only a single disk.
Patrick Terlisten/ vcloudnine.de/ Creative Commons CC0
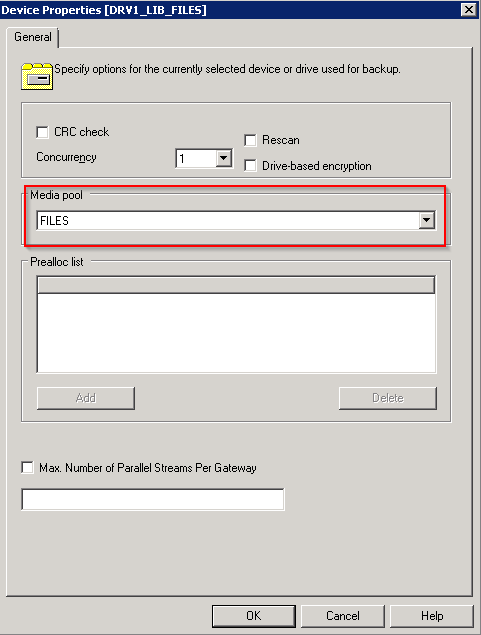
Select the drive(s), that should be used for the job and make sure, that the job uses the correct media pool.
Patrick Terlisten/ vcloudnine.de/ Creative Commons CC0
To make a long story short: I ran multiple full backups to the library and got a dedup ratio of 7:1. Depending on the type of data and the number of backups the value can be lower or higher.

Patrick Terlisten/ vcloudnine.de/ Creative Commons CC0
Final words
This is only a very simple example for a solution based on HP StoreOnce VSA and HP Data Protector. I hope I could show you some key points that have to be observed. If you use a StoreOnce appliance or VSA, you have to align your backup concept to this. Otherwise you may not get the expected results. I would like to recommend these three articles, which were published on the HP Technical Support Services Blog:
DPTIPS: Multiplexing, Multistreaming, Multi … What? DPTIPS: Device Block Size Challenges DPTIPS: 1 way to ensure uninspired StoreOnce VTL performance and 7 ways not to
Some of my thoughts are based on these articles.
