Stunnel and Squid on FreeBSD 11
I don’t like to use untrusted networks. When I have to use such a network, e.g. an open WiFi network, I use a TLS encrypted tunnel connection to encrypt all web traffic that travels through the untrusted network. I’m using a simple stunnel/ Squid setup for this. My setup consists of three components:
- Stunnel (server mode)
- Squid proxy
- Stunnel (client mode)
What is stunnel?
Stunnel is an OSS project that uses OpenSSL to encrypt traffic. The website describes Stunnel as follows:
Stunnel is a proxy designed to add TLS encryption functionality to existing clients and servers without any changes in the programs’ code. Its architecture is optimized for security, portability, and scalability (including load-balancing), making it suitable for large deployments.
How it works
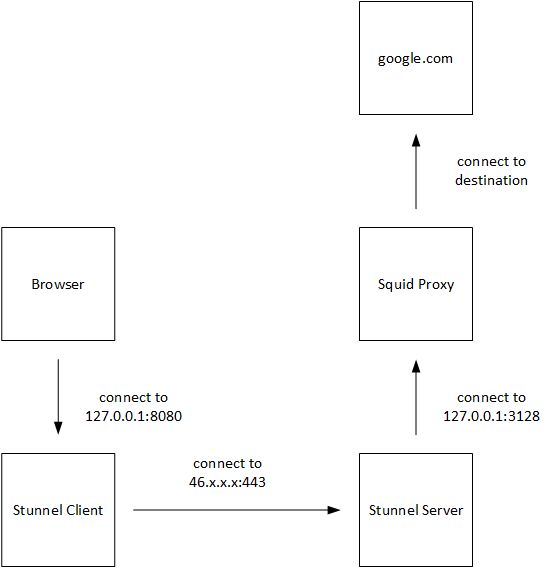
The traffic flow looks like this:

Patrick Terlisten/ vcloudnine.de/ Creative Commons CC0
The browser connects to the Stunnel client on 127.0.0.1:8080. This is done by configuring 127.0.0.1:8080 as proxy server in the browser. The traffic enters the tunnel on the client-side, and Stunnel opens a connection to the server-side. You can use any port, as long as it is unused on the server-side. I use 443/tcp. The connection is encrypted using TLS, and the connection is authenticated by a pre-shared key (PSK). On the server, the traffic leaves the tunnel, and the connection attempt of the client is directed to the Squid proxy, which listens on 127.0.0.1:3128 for connections. Summarized, my browser connectes the Squid proxy on my FreeBSD host over a TLS encrypted connection.
Installation and configuration on FreeBSD
Stunnel and Squid can be installed using pkg install.
root@server:~ # pkg search squid-3.5
squid-3.5.24_2                 HTTP Caching Proxy
root@server:~ # pkg search stunnel
stunnel-5.41,1                 SSL encryption wrapper for standard network daemons
The configuration files are located under /usr/local/etc/stunnel and /usr/local/etc/squid. After the installation of stunnel, an additional directory for the PID file must be created. Stunnel is not running with root privileges, thus it can’t create its PID file in /var/run.
root@server:/var/run # mkdir /var/run/stunnel/
root@server:/var/run # chown stunnel:stunnel /var/run/stunnel
The stunnel.conf is pretty simple. I’m using a Let’s Encrypt certificate on the server-side. If you like, you can create your own certificate using OpenSSL. But I prefer Let’s Encrypt.
cert = /usr/local/etc/letsencrypt/live/server/fullchain.pem
key = /usr/local/etc/letsencrypt/live/server/privkey.pem
pid = /var/run/stunnel/stunnel.pid
setuid = stunnel
setgid = stunnel
sslVersion = TLSv1.2
debug = 3
socket = l:TCP_NODELAY=1
socket = r:TCP_NODELAY=1
verify = 2
compression = deflate

[Tunnel.Web]
accept = 46.x.x.x:443
connect = 127.0.0.1:8080
ciphers = PSK
PSKsecrets = /usr/local/etc/stunnel/psk.txt
CAFile = /usr/local/etc/letsencrypt/live/server/fullchain.pem
The psk.txt contains the pre-shared key. The same file must be located on the client-side. The file itself it pretty simple - username:passphrase. Make sure that the PSK file is not group- and world-readable!
patrick:SuperSecretPassw0rd
The squid.conf is also pretty simple. Make sure that Squid only listens on localhost! I disabled the access log. I simply don’t need it, because I’m the only user. And I don’t have to rotate another logfile. Some ACLs of Squid are now implicitly active. There is no need to configure localhsot or 127.0.0.1 as a source, if you want to allow http access only from localhost. Make sure, that all requests are only allowed from localhost!
acl SSL_ports port 443
acl Safe_ports port 80
acl Safe_ports port 21
acl Safe_ports port 443
acl Safe_ports port 70
acl Safe_ports port 210
acl Safe_ports port 1025-65535
acl Safe_ports port 280
acl Safe_ports port 488
acl Safe_ports port 591
acl Safe_ports port 777
acl Safe_ports port 2222
acl Safe_ports port 8443
acl CONNECT method CONNECT
http_access deny !Safe_ports
http_access deny CONNECT !SSL_ports
http_access allow localhost
http_access deny all
icp_access deny all
htcp_access deny all
http_port 127.0.0.1:8080
cache_mem 1024 MB
maximum_object_size_in_memory 8 MB
cache_dir ufs /var/squid/cache 1024 16 256 no-store
minimum_object_size 0 KB
maximum_object_size 8192 KB
cache_swap_low 95
cache_swap_high 98
logformat combined %>a %ui %un [%tl] "%rm %ru HTTP/%rv" %>Hs %<st "%{Referer}>h" "%{User-Agent}>h" %Ss:%Sh
# access_log /var/log/squid/access.log combined
access_log none
cache_log /dev/null
cache_store_log /dev/null
ftp_user joe.doe@gmail.com
htcp_port 0
coredump_dir /var/squid/cache
visible_hostname proxy
To enable stunnel and squid in the /etc/rc.conf, add the following lines to your /etc/rc.conf. The stunnel_pidfile option tells Stunnel, where it should create its PID file.
squid_enable="YES"
stunnel_enable="YES"
stunnel_pidfile="/var/run/stunnel/stunnel.pid"
Make sure that you have initialized the Squid cache dir, before you start squid. Initialize the cache dir, and start Squid and Stunnel on the server-side.
Installation and configuration on Windows
On the client-side, you have to install Stunnel. You can fine installer files for Windows on stunnel.org. The config of the client is pretty simple. The psk.txt contain the same username and passphrase as on the server-side. The file must be located in the same directory as the stunnel.conf on the client.
socket = l:TCP_NODELAY=1
socket = r:TCP_NODELAY=1
client = yes
sslVersion = TLSv1.2
debug=2

[Tunnel.Web]
accept = localhost:8080
connect = 46.x.x.x:443
PSKsecrets = psk.txt
Test your connection
Start Stunnel on your client and configure 127.0.0.1:8080 as proxy in your browser. If you access https://www.whatismyip.com, you should see the IP address of your server, not the IP address of your local internet connection.
You can check the encrypted connection with Wireshark on the client-side, or with tcpdump on the server-side.
Please note, that the connection is only encrypted until it hits your server. Traffic that leaves your server, e.g. HTTP requests, are unencrypted. It is only an encrypted connection to your proxy, not and encrypted end-2-end connection.
